Page
2.
Open
a new raster layer and call it 'mesh'.
Effects-Plugins-Sinedots
11.
Using
the box at the bottom, click Open
and find the sb_Curve1 cfg file and open.

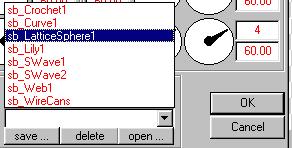
click
on the little arrow and choose sb_LatticeSphere1
from the drop down menu.
Accept
the default settings. Click Ok.
If
the colour is not white,click in the colour box
and change it.
Selections-Select
all. Selections-Float. Selections-Modify
Expand by 1.
Floodfill with white. You may need to zoom
in to see what
you are doing.
Effects-Plugins
Bladepro. Choose Dee's Amber shimmer.
Effects-3D-Drop
Shadow with these settings.
Horiz and
Vert=1, Opacity=60,Blur=0 colour #9D380B.
Effects-Sharpen-Sharpen
more.
Deselect.
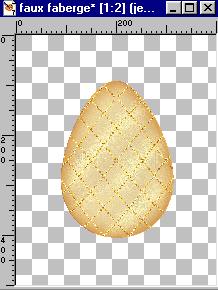
Now would be a
good time to save.
This is what you
should have so far.
Open a new
Raster Layer and call it 'stand'. Load the stand
selection
from disk.
Floodfill with white.
Effects-Plugin
Filters-Flaming Pear-SuperBladePro.
Select Dee's
Amber Shimmer Preset. Effects-Sharpen-Sharpen
More.
Effects-3D-Drop
Shadow with the following settings:-
Colour #A53103.
Horiz 1 Vert 1 Opac 100 Blur 3.7.
Deselect. Save.
Okay now we can
add the jewels.
Open a new image
100x100 transparent. Floodfill this with a dark
colour
to make it
easier to see what you are working on.
Add a new Raster
Layer.
Set your
foreground and background to #FFFFFF(White).
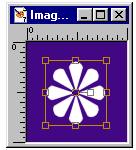
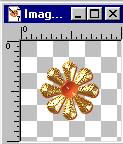
Select your
Preset Shapes and choose a flower shape. I chose
Flower 7. Pull
out the shape to fill about half of your canvas.
Convert to
Raster. Using your Magic Wand click on the canvas
to select
your flower.
Selections-Invert.
Effects-Plugin
Filters-SuperBladePro. Choose Dee's Amber
Shimmer.
Effects-Sharpen-Sharpen
More.
Effects-3D-Drop
Shadow. Use the same settings as before.
Add a new Raster
Layer.
Use your
Selection tool to add a small circle in the
middle.
Floodfill with
white and use a BladePro preset that you like.
It is best to
choose something bright and gem like.
You may prefer
to set a jewel tube in the center.
When you are
satisfied, merge visible layers and tube.
I have provided
the pearl and the gold link for
you to use if
you require them.
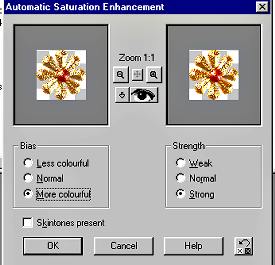
Set your tube to
45%. When you make images small they
lose some of
their clarity and colour, so when I completed
my decoration I
used the Effects-Enhance Photo-Automatic
Saturation
with these
settings.
Put each of your
first four gems on a separate layer then
X out the egg
layer and Merge visible when you are pleased with
the placing of
your gems.
This way you can
decorate in groups of four.
I did the same
with my pearls.
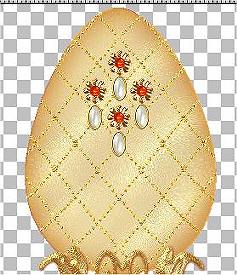
The pearl
ornament at the top is optional. I
wanted to place
something at the top to just finish
my egg.
If you have
tubed it, place it on a new Raster layer
and posistion it
in the middle.
Otherwise
activate the ornament by clicking on it.
Copy then Paste
as a new layer.
When you have
decorated your egg merge visible layers and SAVE.
I hope you have
enjoyed making this egg.
If you have any
problems with my tutorial, do not
hesitate to mail
me.

Page 1.
Back Home Tutorials
Email

Webpage
design by Anita.
Copyright
Daydreamer 2002-2004.
All
rights reserved.
|