 |
Page 2 Step 4. Add a new raster layer. Open 'ellipse.sel' from disk. Using the same settings as we did to floodfill the lace pattern. Floodfill the ellipse selection. Add a new raster layer. Open 'border1.sel' from disk and again using the same settings, floodfill with gradient. Keep selected. Click Images-Effects-Blinds and apply with these settings. Width-5. Opacity-12. Colour Black. Leave Horizontal unchecked. Check Light from the Left/Top. Choose Ok and keep selected. Click Images-Effects-Inner bevel and use the same setting twice. Keep selected. Click Images-Effects-Drop shadow and apply with these settings. Colour-#5B3605 Opacity 100, Blur 3.2 Horiz 0, Vert o. Deselect. CTRL-D Step 5. Add a new raster layer and choose 'border2.sel' from disk. Floodfill and apply inner as before. Keep selected and apply Drop Shadow with the same settings. Deselect. CTRL-D Make 'border1' layer active. Click Layer-Arrange-Bring to the top. Step 6. Make layer 2 your lace layer active.
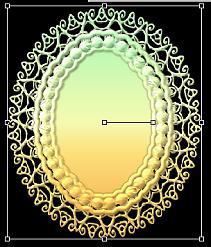
Using the 'Deformation Tool' Move the sides of your lace in and pull the top and bottom out a bit until it looks similar to mine.
Click 'Apply' Using your 'Magic Wand' RGB and a Tolerance of 35. Click the outside of your lace. Selections-Invert. Selections-Modify-Expand and put 6 pixels in. Click OK. Add a new Raster Layer and drag it beneath your lace layer and floodfill with white. Image-Plug-in Filters-Bladepro. Select 'Gold Glass' and apply. Selections-Modify-Contract and again choose 6 pixels. Hit Delete and Deselect. Ctrl-D Image-Sharpen-Sharpen More. Now would be a good time to SAVE. Step 7. Make your 'Ellipse' layer active. Select 'Cross' psp image and Copy and Paste as a new layer, using your 'Mover Tool' center it if
necessary. I have already added a drop shadow. Select 'Fuchia' psp image and Copy and Paste as a new layer. Using your 'Mover' tool place on the center of the cross. Selections-Select All Selections-Float. Image-Effects-Drop Shadow with these settings:- Opacity-53 Blur 3.2 Horiz and Vert 2. Colour Black. Deselect. Ctrl-D. Click on the glasses on your bottom layer that we floodfilled at the beginning to turn it off.
Layers-Merge visible. That's it Finished, I do hope you enjoyed doing my tutorial as much as I did writing it.
This Tutorial is © Copyrighted to me 'Daydreamer' February 2002. Do not copy it or distribute it by e-mail or upload it to another website.You may only link to it via a Text Link. All Right Reserved.2002-2004 |
 |