
Page 2
Effects-Reflection-Kaleidescope
with the following settings.

Selection-Select All,
Selections-Float.
Effects-3D-Drop Shadow with
the following settings.
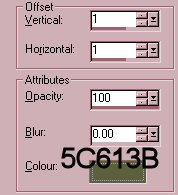
(if you have chosen a
different colour be sure to use a little
darker
shade for your drop shadow-a
muted one works well)

Using your eraser with the
following settings:-


Erase the small star in the
middle of your lace.
Remember to SAVE
Go to Image-Canvas size and
make your size 410 pixels
for both width and height.
Click OK.
This is just to make it
easier to select the outside.
Highlight your bottom
layer(colour) and floodfill with your
background colour to
completely cover the new size canvas.
Make sure your top(lace)
layer is active.
Using the Magic Wand with
the following settings:-

click outside the lace.
Selections-Invert.
Selections-Modify-Contract
by 5 pixels. Click OK.
Do not deselect.
Add a new Raster layer and
floodfill with foreground colour.
Layers-Arrange-Move Down.
Effect-Texture-Blinds.
Width=2 Opacity=18
Horizontal and Light from
left/top both checked colour 5C613B
Repeat Blinds again and uncheck
Horizontal.
Lower the opacity of this
layer to 44.
If there are small areas of
this layer showing around the edges
use the Deformation tool to
nudge them in a little.
X out the
bottom(colour)layer. Make your lace layer
active- Layers-Merge-Merge
Visible.
Adjust-Sharpen-Sharpen.
Remember to SAVE
Ok so we have the basic
lace, on the next page are
some ideas for decorating.
Page 3
Email
Back Next
Tutorials Home
|